|
|||
|
|
|
||
| View Shopping Cart |
| Home |
| Guides Available |
| About the Author |
| FAQs |
| Testimonials |
| Articles |
| Contact Andrew |
| Terms & Conditions |
| Mailing List |
| Links |
 |
 |
Gibbs Guides.com
More high quality articles and information absolutely
free with every
Gibbs Guides newsletter.
Sign
up now!
FSK Chubby Lady
By Colin Stevens
|

The original Flying Styro Kits range of parkfly models moulded in “Styropor” has been around for some years, but is now being eclipsed by more advanced and further developed models. My “Chubby Lady” is from this original range and is a diversion for me, insofar as I wanted to put together their “Fatty Sparrow” biplane. When one of those, plus a “Chubby Lady” plus a “Sky Beetle” came along as a package deal, I jumped at it. Since I would now be working with unfamiliar materials and techniques, I decided that I’d build the “Chubby Lady” first, and try to confine my mistakes to that.
It records in the notes that the “Chubby Lady” is based on a full-size homebuilt designed and built in the 1930’s by Tennessee farmer, Slim Pillow. Apparently he named it in honour of his wife. It doesn’t say whether he actually flew it while still in plaster.
The building instructions are a little sparse, and some of the English is a little quaint, but sufficient for the purpose. I found the building a little more tricky than I’d expected, mainly due to the need to be forever watchful over damaging the foam surfaces, so a soft working surface is a must, with all tools and hard parts put to one side, together with short finger-nails. “Styropor” appears to be an almost generic trade name for expanded polystyrene, but as prepared by FSK it has a reasonably smooth and slightly waxy surface. It is nonetheless, attacked by some solvents.
|

A special adhesive is supplied for gluing the foam parts, but because I’m not familiar with it I ducked-out and used epoxy. I found it virtually impossible to avoid getting some epoxy on the surfaces, especially when inserting the wing halves into their fuselage slots. I found that it could easily be removed by using a piece of soft rag dampened with IPA (isopropyl alcohol). I would urge the prior testing of any prospective solvent in an inconspicuous area.
As always, it pays to go the extra mile in terms of preparation and checking, and online forums provide a lot of useful information. This has led to some desirable modifications that I’ve listed below.
• The pre-bent undercarriage supplied is a little thin, and is too yielding. I re-made mine from 1.5mm dia. piano wire, and very slightly longer too, to allow more prop options. A little more support for the plastic undercarriage mount is a good idea too, so it’s necessary to attend to these before fitting the wings.
• I used lightweight 2-1/2” dia. wheels to replace the 2-part moulded plastic ones supplied, since the FSK wheels are reputed to split easily around the glued joint when landing on hard surfaces, and although looking very charming in a “Noddy & Big Ears” kind of way, are not very aerodynamic. I know others disagree.
• I couldn’t see the wooden tail-skid lasting long, so I replaced it with a fixed ¾” dia. lightweight tailwheel.
• There are many dire warnings about the wings folding at the joint with the fuselage in “violent” manoeuvres. I used parentheses here because it’s difficult to imagine anything violent about this model. The version marketed in Germany apparently had spars inserted into the wings, and many have been modified with bracing wires. I incorporated 5” lengths of 3/16” dia. hardwood dowel into the wing root leading edges, before fitting the reinforcing mouldings. I also reduced the dihedral slightly compared with that shown in the instructions.
• I added a compression web (= a piece of 1/16” sheet balsa) between the motor mounting plate and the wing mount, to reinforce against crumpling the nose in the event of a vertical landing.
• My instruction sheet shows the CG position on a drawing that is not to scale. I didn’t suspect this at first and it therefore led to a significant error in the CG position. I calculated the correct position to be 52mm from the leading edge of the plastic reinforcing strips, and that’s what I’m flying successfully.
• After the first flights, I discarded the rather agricultural 4-part prop supplied, in favour of the much more efficient version used on the “Fatty Sparrow” (type FSK 06, 245mm, Slow Flyer). This made a huge improvement in thrust and motor run-time.
• First flights also showed the need for some motor cooling. I converted a plastic medicine spoon into an air-scoop and fitted this under the motor - just enough air to prevent stagnation around it. Even so, it pays to limit ground-running time at full power to a few secs. It really does make that much difference to get it into the air and let the prop unload.
• The Chubby Lady is supplied with an MIG 280 can motor and 4:1
ratio gearbox. There have been some reports of the gearbox plastic housing
seizing onto the shaft, so since mine was a close fit, I very slightly
eased its hole and regularly oiled, it has been entirely satisfactory.
|
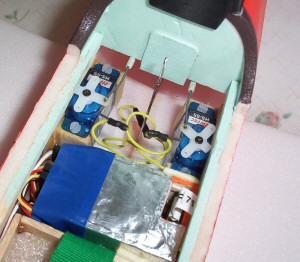
I fitted a couple of Hitec HS-55 servos, and I use an 8-cell or 7-cell 650mAh sintered NiMH flight battery. The 7-cell was not by choice – it started life as an 8-cell, but one cell died. The speed controller is a Kontronik Micro 10, with BEC facility.
A rather fiddly 2-part plastic pilot is provided, but with a little patience this, and other embellishment parts, add a lot of appeal. The pilot is provided with an oversize scarf carrying the FSK logo. This may be fitted one day, but only when it is suitably scaled-down.
With the extra mods and details, my "Chubby Lady" came out at 274g, minus its flight battery. With the 8-cell battery, the all-up weight is 372g. I’m sure you could build it lighter, but at this weight it handles a light breeze better and suits my needs best.
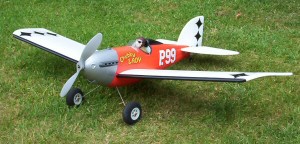
Chubby Lady is now fitted
with an air intake and new prop. |
Flying notes
Quite a little charmer, really. It takes-off easily from not very freshly
mown grass, so I’ve never had to hand-launch it. It handles winds
up to about 12mph, but comes into its own on those quiet summer evenings.
The climb is moderate with my set-up, but it gets up there to very great
heights, and gives flights of 12-20 mins., depending on conditions and
the way it’s flown. I don’t see a lot of difference between
the 7-cell and 8-cell batteries, the power advantage of the 8-cell being
offset by the weight penalty, perhaps. It needs quite a lot of up-trim
in flight, although correctly balanced. I’ve tried the cop-out of
moving the balance point back a little, but this shows the usual twitchiness
you’d expect from an excessively rearward CG. It turns on a sixpence
under rudder and elevator control, so there’s scope yet for reducing
the dihedral.
A pattern-ship it is not. It flies loops after a short dive, and it barrel-rolls, but there is still sufficient flexibility in the wings to see to it that complete precision in these manoeuvres is not one of its attributes. The wing reinforcement has held-up so far, and it has survived tight loops and terminal velocity dives getting-on for 35mph! (I wouldn’t suggest trying both together!). It lands very nicely without tipping, and can be taxied back to the pick-up point.

Pilot “George”
has done quite well so far, and enjoys a comfortable office. |
Conclusion
So all in all, a very nice relaxing little aeroplane, and I now
look forward to building its companion, the “Fatty Sparrow”.
This range of FSK kits and their spares are still advertised for sale at Sam’s, 308 Hobbies, MacGregor and Inwood’s etc. You can read a little more about Slim Pillow’s influence on these models.
A visit to the factory’s website suggested that they may now have become discontinued.
A final tip: Take care if you go online for a Google search for more information. If you don’t qualify your search terms with additional words, you will have only yourself to blame for the lurid responses you get to “Chubby Lady”, very few of them capable of sustained flight, I might add.